Reference to Preparing Tasty The Ultimate Seeded White Sourdough
Hoping to eat The Ultimate Seeded White Sourdough a best restaurant's, but for a few causes are not able to go to restaurants. This recipe gonna guide you with useful procedures on producing a The Ultimate Seeded White Sourdough like a famous chef made.
We hope you got benefit from reading it, now let's go back to the ultimate seeded white sourdough recipe. To make the ultimate seeded white sourdough you need 14 ingredients and 31 steps. Here is how you cook it.
To make an extraordinary The Ultimate Seeded White Sourdough, here are the components needed:
- Use of The Levain.
- Provide 45 g of Active sourdough starter.
- Provide 90 g of Water (30-35 degrees centigrade).
- Take 45 g of Strong white bread flour.
- Get 45 g of Rye flour.
- Take of The Dough.
- Take 800 g of Strong white bread flour.
- You need 560 g of Water (30-35 degrees centigrade).
- Get 16 g of Salt.
- You need of Mixed Seeds (optional).
- Provide of Non-Essentials.
- Get of Mixed seeds for the crust.
- Provide of Rice flour for dusting bannetons.
- Use of Semolina for finishing the bottom of the bread.
After readying the ingridients, now you are ready to cook your 5-star The Ultimate Seeded White Sourdough by following the instructions on this section:
- It's 9am on day one and it's time to start baking. The first job for the day is creating our levain. This is essentially a big feed of our sourdough starter to make absolutely sure that he/she (mine is called Bert) is well fed and ready to make bread..
- Your starter should have risen since it's last feed and be bubbly in texture. A good way to test its fitness is to take a small amount and carefully place it in some water. If it is sufficiently bubbly it will float on the top. If it sinks it perhaps a little longer to wake up or might even need feeding again..
- Add 90g of luke-warm water to a container and combine it with 45g of your active starter. Mixing the starter with the water first makes it really easy to ensure the yeast in the starter are evenly distributed in your levain..
- Next add 45g of white bread flour and 45g of rye flour and mix well. I do this step in a plastic beaker. Its tall narrow shape and see through sides make it is really easy to monitor progress as it slowly rises up towards the top. It's a good idea to loosely cover it with something. I have an old shower cap that I reuse every time I make bread..
- Next you have to wait for your levain to double in size. How long this takes will depend on the temperature in your kitchen and how active your starter is. For me it is generally between 5-7 hours..
- It's now about 3pm and your starter has doubled in size. It's time to get started on our main dough. Add 800g of white bread flour to a mixing bowl and combine it with 560g of luke-warm water. Mix it until it forms into a shaggy ball. We aren't doing any kneading here, our only concern is that the flour is well mixed with the water..
- We now have to leave the dough to rest for 30 minutes so the flour can fully hydrate. This resting process is called an autolyse and its a magical process. It's worth taking a pinch of dough from the top of the ball and stretching it gently upwards before and after this rest period to appreciate the transformation. Before the rest you will find the dough is fragile and breaks off into a lump quite easily. After the rest it will stretch much further and be considerably more elastic..
- After the 30 minute autolyse, we are now ready to mix in the rest of the ingredients. Take all of your levain and place it onto the dough. Then sprinkle over 16g of salt..
- Mixing this can get really messy, the levain in particular is super sticky and is a bit tricky to wash off your hands. As such, I tend to start by taking a piece of dough from the edge of the bowl, stretching it gently upwards and placing it over the levain. I rotate the bowl slightly and repeat this motion until I have done a compete turn and fully contained the levain and salt. This is not strictly necessary but I find it helps to keep my hands slightly cleaner!.
- Next I use my thumb and forefinger to squeeze through the dough and cut a small piece off one side. I move about an inch or two further into the dough and repeat this motion until I have made my way across the whole dough. I then rotate the bowl ninety degrees and repeat the process. Once again, this is not strictly necessary but I do find it a very effective way to quickly and evenly distribute the levain and salt throughout the dough without getting too messy..
- Next we will turn the dough out onto the kitchen worktop and begin a process known as "slap and fold". This involves taking the dough in both hands and slapping down on the bench. A gentle flicking motion is useful to encourage the dough to stretch out away from you. After the slap we then take the side of the dough closest to us and fold it over the other half. Then we pick up the resulting ball, rotate it ninety degrees and do it again. Repeat this 30-40 times until well-mixed..

- Use a bench scraper to gather the dough into a ball and place back into your bowl. Loosely cover the dough and set a timer for 15 minutes, and leave it to rest..
- After the 15 minutes is up we need to do another process called "stretch and fold". Take a small handful of dough from the edge of the bowl and stretch it gently upwards. By now it should be really stretchy but there will still be a point that it starts to resist you and if you go beyond this it will tear. This is not a good idea. Once stretched gently lay it down across the dough. TIP: Wetting your hands before doing this process makes it much less likely that the dough will stick to you..
- Rotate the bowl a bit and repeat this process until you have gone all the way around the dough. This might be 6-8 rotations. You will know when you get back to the beginning because you will hit a bit of dough that doesn't want to be stretched. This is because you have already stretched it! Re-cover the dough, set the timer for another 15 minutes and leave it to rest. We will repeat this process every 15 minutes until we have done a total of four sets of stretching and folding..
- By the time we've completed four lots of stretch and fold it is probably about 4:30-5pm. It's now time to leave the dough to proof. Keep the dough loosely covered, ideally somewhere thats not too cold. If your house is a bit chilly you can put the dough in the oven with just the oven light on to generate a little bit of warmth. This period, also known as bulk fermentation, will usually take about 4-5 hours..
- Its now about 9:00-9:30pm and our dough is ready to shape. Gently turn the dough out of the bowl onto a lightly floured worktop. We want to be gentle with the dough so we don't tear it and break all the structure we built up earlier with the stretch and folds. I use a dough scraper to work my way around the bowl, loosening the dough from the edges. Then I turn the bowl upside down and let gravity slowly do the work of pulling the dough out of the bowl..
- Take a small handful of flour and use it to draw a line across the middle of the dough. Then use your dough scraper to cut through this line and separate the dough into two equal-sized pieces. The flour should prevent the dough scraper from sticking too much..
- Take one of your dough balls and gently lift the left-hand edge, and fold it onto the middle of the dough ball. Repeat this three more times folding in the right side, the edge closest to you and the far edge. Once all four edges are folded in give it a little pinch where the folds meet to seal it and flip the dough ball over. You should be left with a nice tidy dough ball with a smooth top. Repeat these steps for the other dough ball. We then leave these to "bench rest" for about 20 mins..
- It is now time to shape our loaves! Start by lightly dusting the top of the dough ball with flour and then flipping it upside down. You may need the bench scraper to persuade it to separate from the bench. Gently lift one side of the dough, stretch it slightly and fold it into the middle. Then repeat the process for the other side..
- Next take the far side of the dough and start to roll it towards you. The goal here is to create tension on the outside of the roll. Use your thumbs to help keep the dough tucked in tightly as you roll..
- Once it is all rolled up use your palm to squeeze the edge closes to you and seal the edges together to form a seam..
- Roll the dough onto its seam. This is now the bottom of your loaf. You will probably find that the pointy ends of your loaf are a little messy. You should be able to stretch the dough over these end bits to tidy them up if you want to..
- If you want a seeded crust then now is your chance. Pick up the loaf, flip it upside-down and press it into a dish of seeds. Keeping the loaf upside-down transfer it to a floured banneton. To reduce the chances of your loaf sticking to the banneton I would recommend using rice flour. If you don't have any then bread flour should work just fine. If you don't have a banneton you can use a bowl or dish lined with a clean, floured tea towel..
- Another technique that can be useful is to "stitch" the seam together by taking a small pinch of dough from either side of the seam and twisting them together..
- Next I sprinkle the bottom of the loaf (now on top) with semolina. This prevents the cover from sticking to the loaf over night and also gives a really nice texture to the bottom crust after it is cooked. Rice flour or bread flour will also be fine. Then cover the loaves and place them in the fridge over night for their second period of cold fermentation. This long, slow process will really help develop the classic sourdough flavour..
- The next morning it is time to bake your bread. For the best results I would recommend cooking the bread inside some kind of casserole dish, a cast-iron dutch oven or even a massive pan. This has two benefits. Placing the loaf onto a screaming hot pan helps your bread to rise in the early stages of cooking. The addition of a lid creates a steamy environment for the loaf to cook in. This ensures the crust stays supple and allows the loaf to expand, rather than it being dry and restrictive..
- Once your oven and dish is preheated as hot as the oven will go take your loaf out of the fridge and gently turn it out of the banetton into the pan. The seeded side that has been underneath all night in the fridge should now be on top. Next slash the loaf along its length with a sharp knife or razor blade. This will ensure the loaf expands in a controlled manner rather than randomly exploding out the side or bottom..
- Next lightly spray the loaf with a bit of water. Something like a plant mister is ideal for this. Failing that you could use an empty, well-cleaned, cleaning product bottle or just flick some water on with some wet hands. This is another trick to help keep the humidity up in the early stages of cooking..
- Carefully put the lid onto your container and move it into the middle of the oven. At this point you should drop the temperature to about 220 degrees centigrade and set the timer for 25 minutes. When the timer goes off remove the lid and cook for another 15-20 minutes until golden brown..
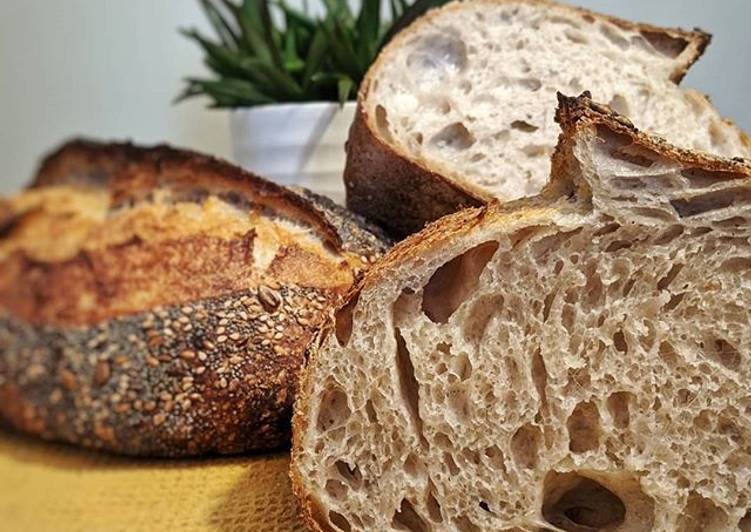
- Remove your bread from the oven and leave it somewhere to cool. The smell is amazing and it's very tempting to cut into it right away but it really is best left to cool for at least an hour, ideally longer, before slicing. Put your container and its lid back in the oven to heat up ready for your second loaf!.
- I hope you enjoy making your bread! If you have any feedback or questions, please leave a comment. Good luck!.
Recipe : The Ultimate Seeded White Sourdough
Foods which can be prepared beforehand and reheated prior to serving are the very best when it comes to cooking for particular occasions. There are a variety of appetizers, entrees, and desserts that will work perfectly in this particular instance. You may usually find them by performing a simple Google search online or by sorting through most of your favorite cookbooks at home. The main issue is that you do not get so involved in the concept of cooking for specific events that you forget to actually like the occasion.
Simple tips to make The Ultimate Seeded White Sourdough
The key is in choosing an extremely straightforward meat dish and then dressing it up with the more decadent side dishes. Incredibly rich side dishes which are simple to prepare are far greater in number than meat dishes which need little culinary work. You should also keep in mind that the audience for the special occasion. Sometimes a family-favorite leaves the occasion seem far more special than an all out attempt for chicken cordon bleu or veal Marsala. There's absolutely no point in visiting a extreme energy to produce a masterpiece if it goes to be riddled with high heeled kiddies proclaiming they don't enjoy this or that about your meal. If this is not the way you would like to do items that is absolutely understandable. A number of us do thrive in high stress circumstances. The main element for those who prefer to do all the meal preparation when cooking for special occasions at the time of cooking is likely precisely and allowing tons of time for possible hiccups from the practice. Mistakes occur when folks feel rushed and raced inside their culinary efforts.
You will be amazed and astounded at all the sinfully rich and delicious meals and side dishes which are available, that are amazingly fast and easy to prepare. This usually means you will not run the too common culprits situations that you hear about and can still be able to have a superb meal that is enjoyed by all.
Still another terrific idea when it comes to cooking for special occasions would be to prepare yourself as far as you possibly can ahead of time so as to alleviate the pressure during the occasion also to enable you time to enjoy the event instead of coping with the specifics of meal preparation. The greatest gift you can genuinely give your self when cooking for particular occasions is the time necessary in order to enjoy these unique occasions. This is not to say there isn't some cooking that will have to get accomplished.
We all have those moments in our own lives once we feel like though all has to be exactly right. It's these moments we frequently refer for special occasions. In regards to cooking for particular occasions, many people find that we shed the chunk at our expectation and feel as though we have ruined the moment. While that is far from the truth, it does serve to reduce as soon as in many of our minds. For this reason, you want to work up a repertoire, if you will, of an easy task to produce special day cooking recipes.
The other common mistake that is created when cooking for specific occasions is cooking out of your comfort zone. Once you are organizing a challenging recipe it's better for those who do this within an occasion when you're not going during the worries of possible people or insuring the best possible of circumstances. To put it differently, it's best to question your culinary talents if you don't need a vested interest . Special occasions are a wonderful time for family and friends. The expectation is you will have a number of special occasions during your lifetime. Do not waste a lot of energy and time fretting over cooking for specific occasions. As an alternative, put all your effort into enjoying those occasions.
Although prepared from limited components, but the outstanding taste of the The Ultimate Seeded White Sourdough you will make using this recipe is a guarantee. Limited ingridients is one of the case which causes many people choose not to cook. So, if you wish your friends can prepare remarkable dish with limited ingridients, share this site so that they will be able to view this helpful recipe.